
How to Create a GIF in Canva for Your Website

Introduction to GIFs in canva
As a business owner, you want your website to capture someone's attention, stand out, and tell visitors exactly who you are and what you do. Creating custom GIFs is one of my favorite ways to do that! In this post, you'll learn how to create a GIF in Canva to add more personality and fun to your business's website.
Benefits of Adding GIFs to Your Website
Here are some reasons why you should consider adding custom GIFs to your website.
Stop the Scroll with Movement
Movement captures people's attention. And let's face it—attention spans are hard to capture and even harder to keep. When you add a little bit of movement to your website, it's more enticing for someone to scroll, click around, and read what you have to say.
Highlight Products or Services
Strategically place your GIFs to draw attention to specific copy, products, or services on your website. For example, your eyes may be drawn to a moving arrow that's pointing directly to a course mockup graphic or freebie opt-in.
Do an audit of your own website, and think about where you could add GIFs to bring even more attention to certain components.
Showcase Your Branding and Personality
Create GIFs that show your personality! For example, below you’ll see a custom GIF I made, turning one of my logos into a record player.
This example obviously ties in a branding element that I love (my logo), but it also shows my personality because I love thrift finds, classic rock, and even took some of my branding photos in a vintage store!
What You Need to Make a GIF on Canva

Are your wheels turning with GIF ideas for your own website? Get creative here—GIFs should be unique and fun! Before we walk through the process, you need two things.
Canva Account
First, create a Canva account. You only need a free account to follow the steps in the next section, but Canva Pro offers additional features you may enjoy.
Brand Elements (if applicable)
Of course if you're planning on turning any of your brand elements into a GIF, like I turned my logo into a record player, make sure you have those handy. Logos, brand elements (like my flowers and navigation elements), etc. are all great options!
How to Create a GIF in Canva
Are GIFS 100% necessary? No. Are they worth it? Yes, because creating a GIF in Canva is super simple. Here are the steps to make your own GIF to add to your website.
Step 1: Login to Canva and create a new design.
Open up Canva and click "Create a design". The dimensions depend on what you're looking to create, but for my example, I used 1000 x 1000 px. Remember you can always resize your design later if you need to!
Step 2: Design your GIF.
Now it's time to get creative! When it comes to designing your GIF, consider:
The placement: think about where it's going to go on your website.
The colors: make sure the colors compliment the other elements it will be near on your site.
The vibe: a sophisticated GIF will look very different than a silly one, so consider your brand and what makes the most sense for you.
If you get stuck designing your GIF, try out a few different concepts. You can always export them all and see what looks best once they’re on your actual website!
Step 3: Add animation to bring your element to life.
It's not a GIF if there's no animation! Here are some ways you can bring your GIF to life.
Use an already animated graphic element.
Inside the editor, click the Elements tab. Here you can search for different elements you like to add to your GIF, and you'll notice that some are already animated! This is one of the easiest ways to create a GIF, because you don't need to add the animation yourself.

Upload a video and add it to a frame.
Another option for adding movement to your GIF is uploading a video! This is how I turned a screen recording of my Bloom membership space into a GIF I can use in marketing materials.
Typically, the easiest way to do this is either directly adding your video to your design or adding a frame that your video rests in (ex. a laptop frame with a screen recording inside it). Remember there will be no sound because you're exporting as a GIF, not as a video!
Add an "animation" effect to a static element.
Find an element you love, but it's not already pre-animated? No worries, we can add an effect to it! To do this, select the element > Animate. Play around with all the different animation effects in Canva!
My favorite animation effects to use for website GIFs are "Rotate" and "Brush". Experiment with the different options and timing until you find what you like. If you were going to turn your logo or brand element into a GIF, this is how you bring it to life.

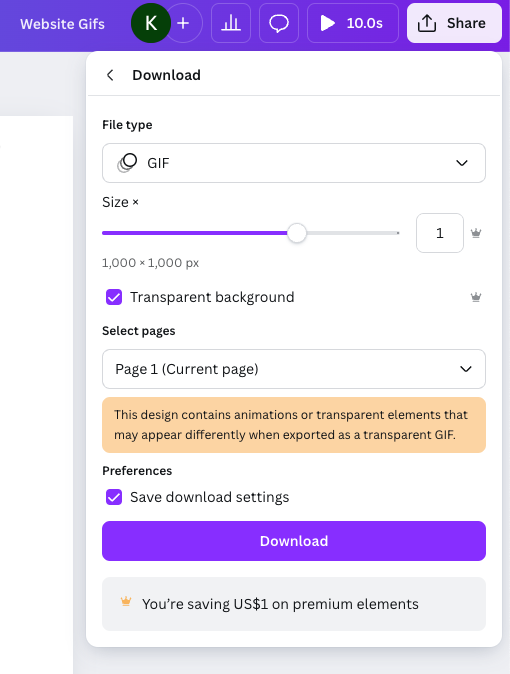
Step 4: Download Your GIF.
Once you're happy with your GIF design in Canva and it has animation, it's time to export! Click Share > Download > GIF file type. Most of the time for websites, it's best to check the "Transparent background" box so you don't have a white background behind your GIF. After that, click "Download" to save your GIF on your computer!
How to Upload Your GIF to Squarespace
Squarespace is the website hosting platform I use, and it's very simple to upload GIFs there. Simply upload your GIF as an image onto your site and drag it where you want it.
Be sure to double check the sizing and spacing of your GIF in both the desktop and mobile versions of your website. Have fun creating!
Looking for more ways to make marketing fun?
If you enjoyed this tutorial and are looking for more ways to make marketing more fun in your business, the Bloom Membership is for you!
This is a space for small business owners to gather, feel supported, ask whatever questions are relevant for them, and receive custom feedback. On one of our office hour calls, I shared my screen and walked members through this exact GIF creation process!
Bloom is basically a marketing mastermind at a fraction of the cost, and there's no commitment required. Come as you are, and stay as long as you need (hopefully forever!). Click here to learn more and join the community—use code “BLOG10” for $10 off your first month!
