How to Use the Canva Bulk Create Tool
Introduction to the Canva Bulk Create Tool
Is graphic creation tedious for you? If you find yourself using the same templates over and over for Instagram carousels, blog post covers, podcast episode graphics, etc., the Canva Bulk Create tool is going to change your life. Essentially, this tool uses templates to create a bulk collection of graphics for you instantly!
This post includes some background information on what this tool is, inspiration for different ways to use it, and a step-by-step Canva Bulk Create tutorial to save you hours of time each month.
What to Use Canva Bulk Create For
Not sure how to use the Canva Bulk Create tool? First, think about what graphics you create over and over again from the same template. Personally, the graphics that come to mind are Pinterest pins, Instagram carousel posts, and blog post covers.
How much time would you save if you didn't need to make each graphic one-by-one? For example, if you're batching podcast episodes for the month, what if you could create all your episode promo graphics in one go?
If you aren't sure what you could use this for, I recommend scrolling through your own Canva designs. Look at which templates you use frequently, and keep those in mind as we walk through the Canva Bulk Create tutorial.
Canva Bulk Create Tutorial (Step-by-Step)
Open up your Canva account and follow along with this step-by-step Bulk Create tutorial.
1. Create a new design with your desired dimensions.
First, create a new design. If you already have templates you'd like to use for this, you may skip this step. Make sure your dimensions for where you're using these templates (Instagram post, Facebook post, Pinterest pin, etc.).
2. Add templates that you'll be using with the needed design components (image, title, headline, categories, etc.).
Canva Bulk Create works by connecting design components with your data. This means certain blocks of text will be linked to your titles, headlines, categories, episode number, etc, and images will be linked as well.
Once you understand this concept, design templates with these components in mind. For example, the block of text designated as your title will likely be in a bigger, bolder font than text designated as your headline. You may choose to only have one image per design to keep things simple. This could take some playing around with Canva Bulk Create, so I recommend starting with simple templates first.
3. Organize and import your data in the Bulk Create tab.
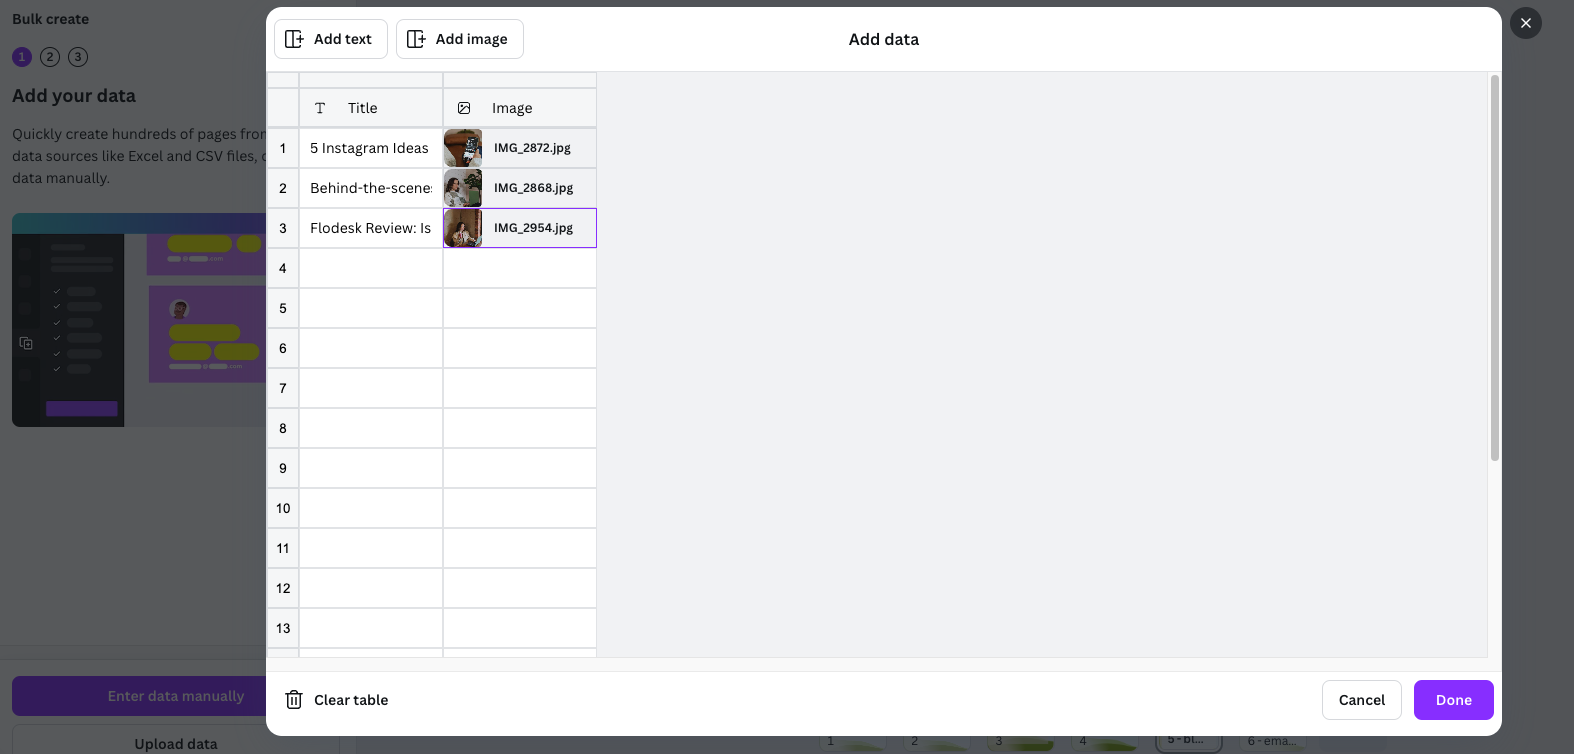
When it comes to importing your data, you have two options: upload an Excel or CSV file, or add your data manually. I find it easy to add data manually, unless you really have a lot of graphics to create at once.
If you're uploading manually:
Navigate to the Bulk create tab (find it under Apps if you don’t see the tab) > Enter data manually. From here, add columns for each design component you need. To keep things simple, I'm just using a "Title" and an "Image", but you could also add columns for headline, categories, etc.
Once you have your columns, fill them out. If you're uploading images to a column, I prefer to first create a folder with them in my Canva for simple selection.
If you're uploading an Excel or CSV file:
Click "Upload data" and select your file. Make sure it's formatted the same way as described above.
4. Connect your data to the respective design components.
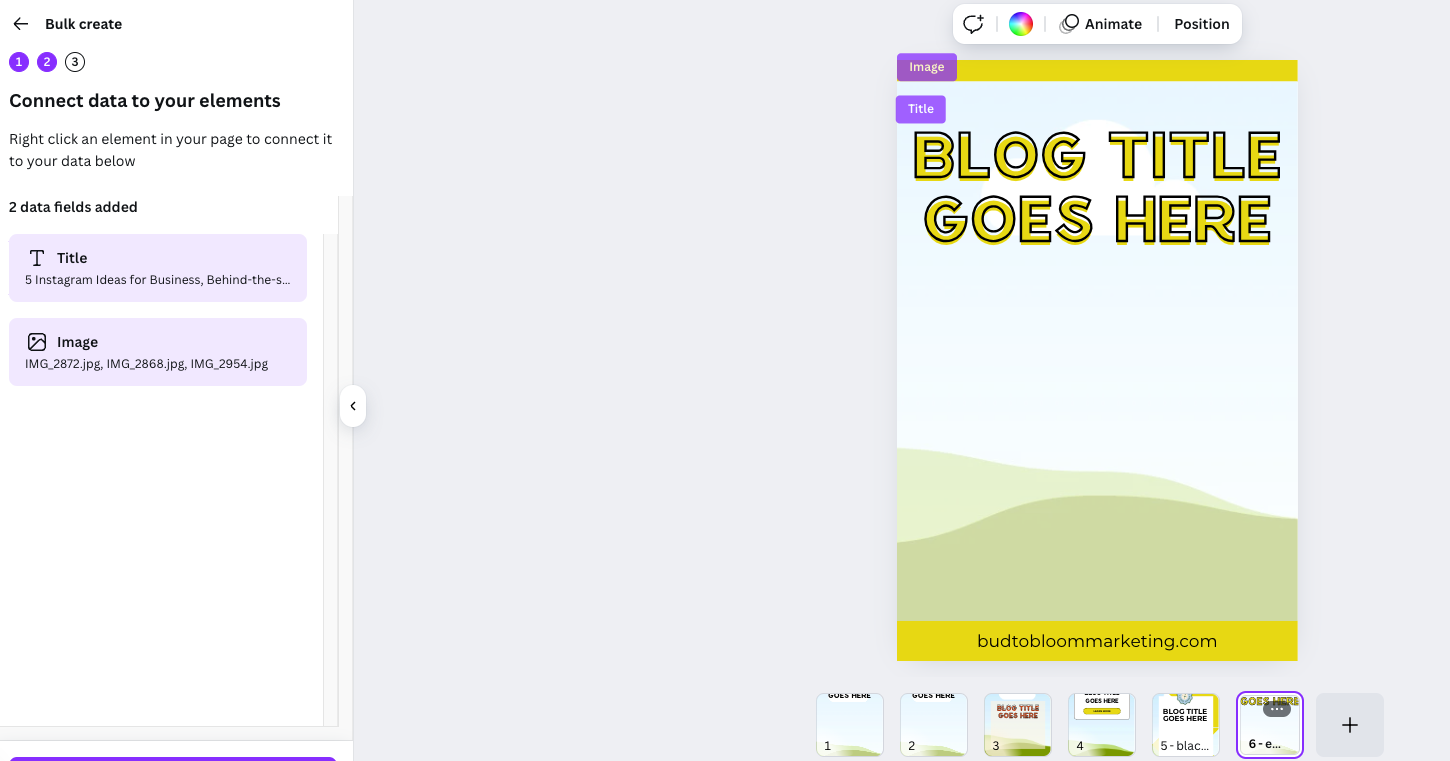
Now that your data is imported, it's time to connect it to your design components. Within each page of your design, you have to select where your title and image should go (or other components, depending on what you need).
Start with the first page of your design. Select your main block of text and click "Connect data". Select Title. Do the same for the image in your design and any other components you need to connect from your data.
Continue this process for each of the pages in your design. In this example, I have 5 unique Pinterest pin templates I'm creating for each blog post.
5. In the Bulk Create tab, navigate to Continue > Generate 1 design.
Now that you've designed your templates and imported and connected your data, your designs are ready! Inside of the Bulk Create tab, Generate your design. This will open a new design using these templates—one for each data set you added. For example, I had 6 templates and 3 data sets, for a total of 18 new designs.
6. Inside new design file, adjust spacing and text size as needed.
While the Bulk Create tool saves so much time, it isn't perfect. You will need to go into each page of your generated design and adjust font size and spacing as needed. Making those small adjustments is much faster than starting from scratch!
7. Export and share your designs!
Now your designs are ready to be shared with the world! Export your designs and use them as you see fit. I typically prefer to export the whole design file as a .zip folder that I can access later.
Looking for more Canva tips and marketing strategies?
Did you enjoy this Canva Bulk Create tutorial? Interested in learning more marketing strategies and tips that will save you time and streamline your process? The Bloom Membership is for you!
Bloom is your go-to space for creative inspiration, brainstorming, and strategy. This exact tutorial is something I showed members on our monthly office hours call. We love practical education and helping each other grow. Click here to learn more about the Bloom Membership and get $10 off your first month using code "BLOG10"!


